Sunday, December 9, 2012

Christmas cheer

Hi all:

Yesterday was our Coffee Girl get-together.  I dearly love to hang out with these four friends.  I believe that it's because they have my best interests at heart.  They listen to me whine, forgive my faults, bolster my spirits, and encourage me when I feel inadequate. We have our favorite places to eat (Moe's, Ruby Tuesday's, Wegmans, Olive Garden) and our favorite places to go (the beach, Sara's, craft stores) and our favorite things to do (shop, craft, eat, bake, and gab).  We've created many memories together over the past few years and I, for one, hope it is just the beginning.

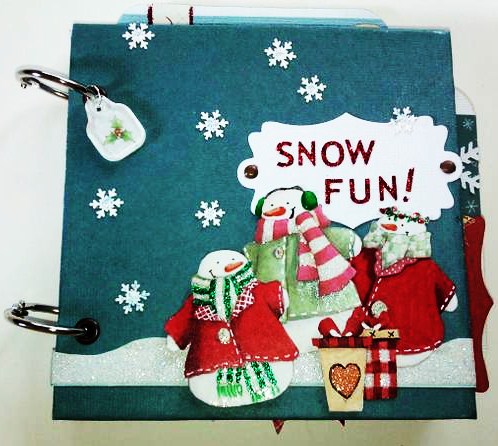
Most years, they are the ones creating fabulous Christmas cards and this year was no exception.  Rita's was a stunning pattern of embossed white snowflakes on a dark blue background - one of my favorite combinations. Susan's was a thermal coffee cup - the Starbucks take-out kind - and the lid pulled out to reveal the sentiment.  Extremely clever!  I don't usually do handmade cards, but this year I gave it a whirl.  Because I'm into the subway art, I decided to create a piece that highlighted who we are and what we do and like.  I had also found the All Is Bright line from My Mind's Eye when three of us went on an excursion to Archiver's in November.  So pretty and I was so anxious to play with it.  So, the subway art and All Is Bright came together to form this:


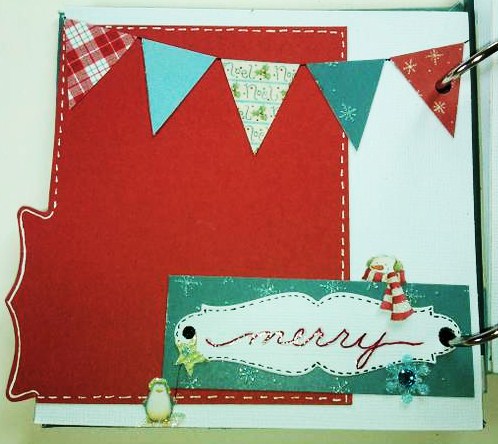
It's one of my favorite pieces ever and I had fun putting it together.  The girls seemed to enjoy getting them, which made all of the hard work worthwhile.  Here's a close up...


Tons of fun and good times wrapped up in this little card.

Have a warm, wonderful, merry Christmas season!

Kathy


Tuesday, November 6, 2012

Learning something new

Hi there!

I saw a card recently that I loved.  It had a piece of subway art on it.  Since I love the look of subway art, I decided to track down the stamp, scrapbook paper, or whatever the card's creator had used to make the subway art.  I had no luck.

While talking to a friend, she mentioned that she planned to make her own with her Photoshop program.  I didn't want to purchase Photoshop because I wasn't sure if I'd like it our how much I would use it.  In the end, I downloaded GIMP.  It works almost the same as Photoshop, but it's free.

There is a learning curve involved with this kind of a photo editing program.  My family can attest to the fact that I spent hours trying to figure out how to do this.  Finally, it was finished.  Looking back, there are some things I wish I'd done differently, but it turned out pretty well, I think.  My brain is full of ideas about how to take this newly acquired skill and run with it.

Anyway,  here is the completed card.


Came out pretty well, I thought.  Black and white isn't a typical color combination for Christmas, but in this case, it works.  I think the touches of red Stickles really added something to it - makes it a bit more Christmas-y.  :)


I've already created another piece of subway art, using the words from a famous Christmas carol.  I hope to post it soon.

Talk to you later!

Kathy


Saturday, October 20, 2012

Country Christmas basket

Hi all:

This week, I've been working on a Christmas project.

On November 10, the youth group at my church is sponsoring a harvest dinner and gift basket auction.  They ask for the gift baskets to be donated every year.  What do you think about a Country Christmas gift basket?  I'm creating a set of six cards, three ornaments, and a write on/wipe off board, all done in a vintage country theme.  So far, I have completed five cards.  I got a little carried away on Wednesday night and stayed up all night working on cards.  You girls know what I mean when I say "I was in the zone", right?  Yeah - that's where I was.  I got three cards completed that night and then I slept from 7 AM until noon!


Sooooo...here they are.  Which one is your favorite?


Okay, off to spend time with the family for the day!  Enjoy all!

Kath
  

Tuesday, October 2, 2012

Tree Trimming...

Last Saturday was Crop Day at Michaels.  I decided to pick up a new Sizzix die and play with it.  I'd been toying with some ideas for this particular die and decided it was time to try it out.


I planned to make cards with this and, because it's a tree, I started playing with different patterns of green paper.  As I was cutting out the trees, I thought it would be cool to use the negative side of this die, too, so I made the first tree card using a negative.


I placed a glittery, embossed piece of green cardstock behind the shape of the cut-out tree, matted it, added the ribbon, and I was done.  


This one is using the negative method, too.  I glittered the card, placed the negative cut-out tree over the glitter and added the snowflakes made from Martha Stewart's Punch Around the Page set in the Aspen pattern.  


I used the actual tree on this one.  I did kind of an ombre glitter effect.  The ombre turned out really well, but this was a bit more time consuming.  I mounted it on an embossed mat reminiscent of swirling snow.  


As I was taking a picture of the last green card, Lucky decided to photobomb the picture.  This card has two cut out trees mounted on it - one cut out of a pattern, the other cut out of plain green cardstock - and then decorated with Stickles.  The snowflake pattern along the edge is a Martha Stewart punch.

By this time, I was getting a bit tired of green, so went with a couple of other color patterns.


What's Christmas without the red to go with the green?  :)  This card is a cut out tree mounted on a plain white card, embellished with Stickles, and tied with a glittery, red ribbon.


Again, a white tree mounted on a white mat, mounted on a white card.  Martha Stewart's turquoise and silver tinsel glitters add the sparkle here, as well as three colors of her fine glitter as embellishments.  


Off to play with paints today!  Enjoy those fall colors....  

Kath


Friday, September 28, 2012

Blessings!

Yesterday, I spent some time doing some paperwork.  Today, I need to send some of that paperwork to a friend.  I started to reach for a plain old business-sized envelope, but then I decided to make her a card instead.

I dug out all of my fall colors and some really cool fall stamps and went to work.  The stamps are by Inkadinkadoo and the colored papers are all by Bazzill and Core'dinations.

I colored the image with my Tim Holtz Distress Markers in Fired Brick, Vintage Photo, Wild Honey, and Spiced Marmalade.  With the inks still on the stamp, I lightly spritzed the stamp with some water from my
Mini-Mister.  Then, I stamped the image onto some watercolor paper.  After that dried, I tore the edges of the watercolor paper and set the stamped image aside.

I mounted the background colors on to the card - Scarlet by Core'dinations and Tangelo by Bazzill - then tied some jute around the top color -Mango by Bazzill - and mounted it on top.  I added some 3D foam pieces by EK Success to the watercolor stamp to lift the image over the jute and give it some depth.


Next, I applied the same watercolor stamping technique to a Martha Stewart maple leaf stamp, using the Mustard Seed and Spiced Marmalade markers.  I cut the maple leaf out to use as an embellishment.  Then, using Tim Holtz's Gathered Twigs Distress Ink pad, I stamped the word "Blessings" on a piece of plain white cardstock and mounted it and the maple leaf on another piece of the Tangelo paper.  


Finally, for a little sparkle, I place small dots of Copper Stickles among the branches of the tree, as well as on the Blessings tag.


And there you have it - a sweet little autumnal card that I hope will bring a smile to my friend.  :)

Blessings!


Wednesday, September 26, 2012

Summer Send-off

It's one of my favorite kinds of days here in Pennsylvania.  It's rainy and cool - 59 degrees.  Just right for fall.  I have a candle burning and my cats are sleeping beside me.  The leaves are just beginning to change right outside my window.  It's a soup, snuggle, and sleep kind of day.

But, summer officially ended only five days ago.  So, as a last hurrah for the summer of 2012, I have a beach card to show you today.

Isn't it pretty?  I really like this one - simple, airy, light.  I stamped the little girl on watercolor paper with black Stayzon ink and colored her with watercolors.  


The background is also watercolored.  After mounting the background to the front of the card, I tied a piece of jute around the card, then cut out the stamped image and mounted it over the background and the jute with foam squares.


This stamp set from Clear Arts is called "Seaside".  It's one of my favorite stamp sets ever.  Besides the stamp set and ink, this card uses only watercolors, watercolor paper, and jute.  Simple.  Summery.  Sweet.


Good-bye, summer.....


Thursday, September 6, 2012

New Goals...

Hi all:

First of all, before I forget, the date for the September Crop has been changed due to scheduling conflicts in the store.  It will now be held on September 29 from 10 - 4.  The cost is $5 and you can come all day or for just a couple of hours.  There are three Cricut machines and several cartridges available for your use, as well as a Cuttlebug, two paper trimmers, and several stamps and punches.  You can work on Christmas cards or your Back to School album.  Bring your pictures, your supplies, and your excitement.  Have a day with the girls!  You deserve it!  :)

I have a new goal.  I would like to be a part of a design team within the next year.  As a member of a design team, the designer or the manufacturer sends you some of their product and an assignment.  You create something with their product, following their guidelines.  Amazing fun!  You get free product, tons of exposure in the paper arts world, and you get to make cool stuff.  Sometimes, you even get paid.  How cool is that?!

Currently, there is a corporation looking for members of their Creative Arts Team.  They asked for four projects demonstrating specific styles they want to see.  So, I put together a couple of things to send in to them.  I must admit I had fun doing them.  I created five things to submit, but these two are my favorites.

The first is a card.  I used one of EK Success's Inkadinkadoo stamps for this card.  I really like the symbolism and appeal of a single flower kept alive in a soda bottle.  Who hasn't done that?  And, sometimes, that single flower - picked at random - means more than  a dozen of the finest roses.  It's a memento - someone was thinking of you.  It's a souvenir of a stroll on an otherwise forgotten summer day.  It's a reminder of the beauty and exquisiteness in the little things that are all around us.  This card reads:  "For you."  "For everything."  Simple.  Heartfelt.


The stamp and ribbon are colored with Tim Holtz's Distress Markers by Ranger.  The crystals are by Jolee's.  The image was stamped on watercolor paper.

The second project is close to my heart because I love the beach - the solitude, the freshness, the warmth, the colors - just love it.  

Here is a clean and simple beach layout:


The stamps are by Clear Art Stamps.  I created the dimensional shell, sand dollar, and starfish with Martha Stewart's Crafter's Clay by EK Success and they were colored with Tim's markers.  I really liked how this one came out - it gives me the same feelings as the beach.  :)

Be back soon.  I'm working on an album from my recent trip to Louisiana.  I'll be sharing it with you soon.  :)

Kathy


Wednesday, July 25, 2012

Christmas in July

In this age of technology, it's a huge frustration when a computer goes down.  Mine went silent on June 12.  Since then, I've limped along with my iPad, but frankly, it just doesn't do everything I'd like it to do.  So, my blog writing has suffered.

The lack of a computer has not hampered me from creating new things, however.  I've been super busy cranking out item after item.  Over the last ten days, I've been feverishly working to get sample items together.  I wanted to use them to apply for Heidi Swapp's media team.  I completed all of the samples, only to find myself stymied by the lack of proper computer technology.  Kind of tough to actively promote your technology skills with...well...technology.  Three hours before the deadline, I gave up.  There will always be next year.

I also recently put together a mini album.  My sister's branch office assembled a "Christmas in July" basket for a company picnic that was held last week.  She asked me to create an album for the basket.  I pulled out my Christmas papers and went to town.  It was kind of fun to bring out the Christmas stuff again.

The album measures 5" x 5" and there is room for a minimum of 18 pictures.  There are four pockets in the album, a tiny "openable" as Heidi Swapp calls them, and lots of pretty things.  My sister was thrilled.  I hope the recipient of the Christmas in July basket was also thrilled!  :)


This page features one of the pockets and some little embellishments on sticks.  It's finished off with some silver and white twine.  Super cute!


Pennants are a hot theme right now - love these made from lots of pretty papers in the stack.  The embellishments at the bottom include a snowman - his scarf flapping in the winter wind -, a little penguin floating his star shaped balloon, and a sparkly snowflake highlighted with a blue Swarovski crytal.  


Another pennant banner, this one being held up by two cute little snowmen.  This banner floats free of the page so that a picture or journaling can be added under it.  


Another pocket page - this one on the side between the two pages.  I love the cream and blue winter-y colors on this page.  More glittery snowflakes are highlighted....


This pocket holds a journaling tag, or two, if you prefer.  More pretty blue and cream colors.

I love plaids.  This one is so cheery!  More sparkly snowflakes and Swarovski crystals.  
My favorite page of the book!  This is the cover of a mini open-able flip album, as Heidi Swapp calls them.  There is room to mount pictures and journaling on this page, if desired.  But the coolest feature is....wait for it....

The pages flip up to reveal MORE places to put memorabilia, pictures, journaling, notes, or whatever you desire.  On this one small 5" x 5" page, the flip book allows room to store at least five pictures.  Amazing!  More pages of the flip book follow....


This last page is a pocket, too, which allows it to hold more than one picture or memorabilia.  It could also be used to just frame some pictures and skip the pocket altogether.  I love versatility!!  :)


ANOTHER pocket.  More great ways to store things in a small space.  The tag sports red glitter dots along the top edge.   I also love that super glitzy, glittery arrow.  So pretty!


Aren't these guys adorable?!  Love, love, love them!  This is a pocket page, too.  You can see the tag sticking up out of the top of the pocket.  


Here's the tag.  I love the word "this".  Remember this.  Feel this.  Think about this.  Experience this.  Celebrate this.


The back of the "This" tag.  Sweet little bow and some gingham.  You can't go wrong there.  :)

And finally.....


Santa Claus!!!  

I hope you enjoyed this little album.  I had a great time making it.


Friday, May 25, 2012

Hidden treasures

Hi all:

I love looking through all of the January CHA releases.  Since winter CHA happens right after Christmas, all of the pretty new things to look at and dream about using are a  great way to escape the winter uglies that happen in February and March. 

This year, there were two new products that really drew my eye.  One was Tim Holtz's Distress Markers because - hello - I'm a Tim Girl.  The other was Heidi Swapp's Memory Files.  What a great way to collect all of the bits and pieces of an event into one compact, easy to store album.  Heidi's Sugar Chic collection is full of bright splashes of aqua, pink, and yellow, set off by stabs of black here and there.  Pure awesomeness!  The cutest embellishments ever are also available.

I couldn't resist combining Heidi's ideas with Tim's flair for the vintage and steampunk.  Here is what I came up with:


The adorable little truck is one of Tim's stamps from The Journey by Stampers Anonymous.  The label on the file folder tab was cut with Spellbinders' Grommet Tags die. 


Here is the entire cover.  The gold scrolls were created with Martha Stewart's Craft Clay and the Frames and Flourishes silicone mold.  The flourishes were then painted using Martha Stewart's gold metallic paint.  The paper is Antiquities by Donna Salazar for gcd studios.  This was a plain old manila folder when I started.  It's colored with some of Tim Holtz's Distress Inks - Weathered Wood, Vintage Photo, and Gathered Twigs.

Here are some inside shots:


Same Spellbinders' die, same paper, same distress inks.  The pink tinsel glitter is Martha Stewart's. The silver glitter is Stickles by Ranger.  The ruffled newsprint is Tim Holtz tissue tape, simply gathered into ruffles as it was adhered.  The copper and white twine by Bead Landing, the letters, and the Recollections flowers are all from Michaels.   The letters were white.  I colored them with a gray Copic marker.  :)  The button is an old one - from Bo Bunny, I think.

Here is a complete look at the inside:


This nifty little album lies almost flat when closed, taking up very little space, yet it will hold up to 24 pictures and journaling notes!  Isn't that amazing?!  I love that concept!  That little booklet that say, "Magic" on the bottom right flips open to display 12 pages.  The "Captured" note flips up to display one or two pictures or notes and you can also put something on the front of that if you like.  The button closure hides places for two pictures and a note or three pictures.  It has a magnetic closure.  And the gadget tied with jute on the left side will also hold 3-4 pictures.  And that doesn't even count the front where you can add a title or a picture or both.

I just love this little file.  Hope you enjoyed looking at it!

Kath


Sunday, May 20, 2012

Summer frames

I've been a busy girl for the last week.

In February, a little girl named Isabella was born.  She was premature,weighing only 1 pound and 2.8 ounces.  She had to have surgery to close a hole in her heart.  She is so tiny - so very fragile. And she is already an important member of our community.

This is Isabella at one month old.


In a few weeks, our community is holding a spaghetti dinner fund raiser for Baby Isabella.  There will also be a Chinese auction.  My friend, Tracy, asked me if I could contribute one of my handcrafted items for the Chinese auction.  

I happened to have a couple of unfinished frames and some new Martha Stewart Crafting Clay in my stash, and I had a few ideas running through my head.  On Wednesday night I got down to work.

Here are the final results.  First up is a summery, rather beachy scene, inspired by Webster's Page's new line called the Palm Beach.  I loved the colors in this line and wanted to find a way to work with them.  


There is a quote written around the heart opening that reads, "The cure for anything is salt water - sweat, tears, or the sea."  Isak Dinsen


The other frame is also summery, although it's more about our summer holidays.  So...it's...ya know - patriotic and stuff.


So, which one do you like best?