Showing posts with label creating albums.. Show all posts

Friday, May 25, 2012

Hidden treasures

Hi all:

I love looking through all of the January CHA releases.  Since winter CHA happens right after Christmas, all of the pretty new things to look at and dream about using are a  great way to escape the winter uglies that happen in February and March. 

This year, there were two new products that really drew my eye.  One was Tim Holtz's Distress Markers because - hello - I'm a Tim Girl.  The other was Heidi Swapp's Memory Files.  What a great way to collect all of the bits and pieces of an event into one compact, easy to store album.  Heidi's Sugar Chic collection is full of bright splashes of aqua, pink, and yellow, set off by stabs of black here and there.  Pure awesomeness!  The cutest embellishments ever are also available.

I couldn't resist combining Heidi's ideas with Tim's flair for the vintage and steampunk.  Here is what I came up with:


The adorable little truck is one of Tim's stamps from The Journey by Stampers Anonymous.  The label on the file folder tab was cut with Spellbinders' Grommet Tags die. 


Here is the entire cover.  The gold scrolls were created with Martha Stewart's Craft Clay and the Frames and Flourishes silicone mold.  The flourishes were then painted using Martha Stewart's gold metallic paint.  The paper is Antiquities by Donna Salazar for gcd studios.  This was a plain old manila folder when I started.  It's colored with some of Tim Holtz's Distress Inks - Weathered Wood, Vintage Photo, and Gathered Twigs.

Here are some inside shots:


Same Spellbinders' die, same paper, same distress inks.  The pink tinsel glitter is Martha Stewart's. The silver glitter is Stickles by Ranger.  The ruffled newsprint is Tim Holtz tissue tape, simply gathered into ruffles as it was adhered.  The copper and white twine by Bead Landing, the letters, and the Recollections flowers are all from Michaels.   The letters were white.  I colored them with a gray Copic marker.  :)  The button is an old one - from Bo Bunny, I think.

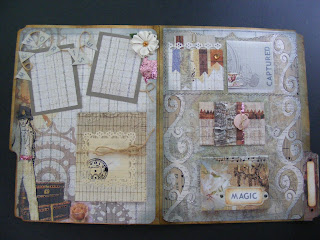
Here is a complete look at the inside:


This nifty little album lies almost flat when closed, taking up very little space, yet it will hold up to 24 pictures and journaling notes!  Isn't that amazing?!  I love that concept!  That little booklet that say, "Magic" on the bottom right flips open to display 12 pages.  The "Captured" note flips up to display one or two pictures or notes and you can also put something on the front of that if you like.  The button closure hides places for two pictures and a note or three pictures.  It has a magnetic closure.  And the gadget tied with jute on the left side will also hold 3-4 pictures.  And that doesn't even count the front where you can add a title or a picture or both.

I just love this little file.  Hope you enjoyed looking at it!

Kath


Friday, March 23, 2012

Emily's Book

Hi all:

So, after I got all three of my cards done for the Stamping Royalty challenge, I started to focus on other projects that were lined up.

Last year, I experimented with making some small graduation albums for my nieces and nephew.  They measured about 5" x 5", making them small enough to be pretty portable if they wanted to take them to school. I'm not sure if they ever used them (they are teenagers, after all), but the adults seemed to appreciate all of the effort that I put into the albums.  :)

This year, my mom asked if I'd do one for my cousin's daughter, Emily.  I promised her I'd get started with it as soon as the cards were done for the challenge.  Tonight, I finished it.  It was kind of fun to do this album for Emily, as she is graduating from my alma mater.


 That's our little mascot - the Lakota Raider.  :)  I got him off the Raiders' facebook page.  I printed him, cut him out, and then highlighted him with glossy accents.  The words were printed off and cut to fit the matted piece.


The corners of the striped paper were punched with a Martha Stewart punch, then blue cardstock was placed behind the punched corners to bring out the detail.


I like how this page turned out.  The matted areas can be used for pictures, memorabilia, or journaling.  These are different colors of cardstock, one matted on top of the other.  A couple of them were highlighted with patterns using a white gel pen.


I drew the volleyball and then filled it in with glossy accents.  The words were printed out in blue ink and then matted on matching cardstock.


The paper lace was cut out with a Fiskar's punch called "lace".  The tag was cut with a spellbinders die.  The pearls were colored with a copic marker and the words are handwritten.  The page on the left is actually a pocket page.  I like to include pockets to catch things the folks might not want to glue into a book.


Just cardstock and blue glitter letters.  I included all of the textspeak to make it more teen friendly.  :)


Emily was in the school play this spring.  The rose under glass is hand-drawn.


 The paper with the lace edges is punched with a Martha Stewart "Punch Around the Page" set.  The word is printed off and then adhered to the page.

I hope Emily enjoys filling this with all kinds of memories from her senior year.

Take care ~
Kathy


Thursday, February 23, 2012

Summery sample

Hey there, everyone!

Sorry it's been a few days.  Sometimes life gets in the way...  :)

Michaels is having their annual Open House on Saturday, March 3 from 1:00 - 3:00.  This event showcases the talents of the instructors at Michaels, giving them an opportunity to display their samples of the Michaels curriculum.  Since our store is so new, none of us have samples from past years to draw on, so it's a bit frenzied as we all work to create some spectacular samples for our customers' viewing pleasure.

Not only are we working to make samples, we are also working to make story boards - kind of a portable bulletin board display listing our class offerings.  Some of our samples will be posted on the story boards; some will be displayed on tables.

I am the scrapbook instructor, of course, but the beading, knitting/crocheting, fine arts, and cake making instructors will be there as well.  I'm really excited about spending a couple of hours with my fellow instructors and sharing our crafting enthusiasm with prospective students.

Yesterday, I set out to knock out a few more samples.  I'm very particular about my finished samples, so I put a little extra time into them.  For that reason, I didn't get as many samples done as I would've liked, but I'm pleased with what I finished.

Die Cuts With a View (DCWV) has a stack of papers called Four Seasons.  I picked that up last week because the summer pages really caught my eye and I wanted to play with them.  I picked up two sets, in fact.  One for store use and....one for ME!  :)


I love the country, cheerful, sunniness of these two pages.


So, this is how my day started out:


You'll see a lot of my basic tools in that picture - Tim Holtz's ruler, my Cutterbee detail scissors (LOVE those!), my Fiskars corner rounder punch and one of Martha Stewarts' Punch Around the Page sets.  The other bits and pieces are the logos to put on my story boards.

One other picture of note:


When I'm in "the zone", intense on my work, I tend to set up a semi-circle.  Oh - there's my Recollections paper trimmer.  :)

After four hours of creative fun....


Voila!  I really liked how this turned out - it's so me!  Unfortunately, I don't usually scrap in the 12 x 12 format, so I wouldn't do one of these for personal use.  I might, however, replicate it on a smaller scale for one of my books.....  Stay tuned....  :)

Kathy

Friday, February 17, 2012

Making "mistakes"

Hey there:

Over the last couple of days, I haven't had time to be at my desk playing with pens, paints, and powders.  I hope to remedy that situation tomorrow.  In the meantime, I was reading through the blogs I like to follow and came across this one today.

What I love about this is that Ali Edwards - one of the most well-known and beloved names in the scrapbooking field - walks us through one of her creations in an honest, transparent way.  In this post, we see that scrapbooking is truly a process.  You start with a vision that may or may not turn out the way you see it in your head, you use tools you're not familiar with and find out they do exactly what you wanted them to do - or not - and you make mistakes.  When I make a mistake in my scrapbooking, I tend to go with it.  What can I add to it?  How can I change my original vision to embrace what I just goofed up?  Is there a creative way to cover it that will look as if I planned it that way all along?  See?  It's very difficult to truly make a mistake.

Anyway, on with Ali's process.  I really like the way she wrote the embossed words on this and then journaled in between.  Definitely a technique I want to try.  Enjoy!

http://aliedwards.com/2012/02/siblings-traditional-scrapbook-layout.html?utm_source=feedburner&utm_medium=feed&utm_campaign=Feed%3A+aliedwards+%28%7B+A+%7D%29


Kathy

Saturday, February 11, 2012

Hi all:

I know I"m on a Heidi Swapp kick lately, but heckfire - you have to see this.  She is installing magnetic closures on her albums.  The coolest thing.  I can't wait to try this.  Have fun watching this one....

http://www.mycraftchannel.com/?omedia_id=899