Showing posts with label Stickles. Show all posts

Tuesday, October 2, 2012

Tree Trimming...

Last Saturday was Crop Day at Michaels.  I decided to pick up a new Sizzix die and play with it.  I'd been toying with some ideas for this particular die and decided it was time to try it out.


I planned to make cards with this and, because it's a tree, I started playing with different patterns of green paper.  As I was cutting out the trees, I thought it would be cool to use the negative side of this die, too, so I made the first tree card using a negative.


I placed a glittery, embossed piece of green cardstock behind the shape of the cut-out tree, matted it, added the ribbon, and I was done.  


This one is using the negative method, too.  I glittered the card, placed the negative cut-out tree over the glitter and added the snowflakes made from Martha Stewart's Punch Around the Page set in the Aspen pattern.  


I used the actual tree on this one.  I did kind of an ombre glitter effect.  The ombre turned out really well, but this was a bit more time consuming.  I mounted it on an embossed mat reminiscent of swirling snow.  


As I was taking a picture of the last green card, Lucky decided to photobomb the picture.  This card has two cut out trees mounted on it - one cut out of a pattern, the other cut out of plain green cardstock - and then decorated with Stickles.  The snowflake pattern along the edge is a Martha Stewart punch.

By this time, I was getting a bit tired of green, so went with a couple of other color patterns.


What's Christmas without the red to go with the green?  :)  This card is a cut out tree mounted on a plain white card, embellished with Stickles, and tied with a glittery, red ribbon.


Again, a white tree mounted on a white mat, mounted on a white card.  Martha Stewart's turquoise and silver tinsel glitters add the sparkle here, as well as three colors of her fine glitter as embellishments.  


Off to play with paints today!  Enjoy those fall colors....  

Kath


Friday, September 28, 2012

Blessings!

Yesterday, I spent some time doing some paperwork.  Today, I need to send some of that paperwork to a friend.  I started to reach for a plain old business-sized envelope, but then I decided to make her a card instead.

I dug out all of my fall colors and some really cool fall stamps and went to work.  The stamps are by Inkadinkadoo and the colored papers are all by Bazzill and Core'dinations.

I colored the image with my Tim Holtz Distress Markers in Fired Brick, Vintage Photo, Wild Honey, and Spiced Marmalade.  With the inks still on the stamp, I lightly spritzed the stamp with some water from my
Mini-Mister.  Then, I stamped the image onto some watercolor paper.  After that dried, I tore the edges of the watercolor paper and set the stamped image aside.

I mounted the background colors on to the card - Scarlet by Core'dinations and Tangelo by Bazzill - then tied some jute around the top color -Mango by Bazzill - and mounted it on top.  I added some 3D foam pieces by EK Success to the watercolor stamp to lift the image over the jute and give it some depth.


Next, I applied the same watercolor stamping technique to a Martha Stewart maple leaf stamp, using the Mustard Seed and Spiced Marmalade markers.  I cut the maple leaf out to use as an embellishment.  Then, using Tim Holtz's Gathered Twigs Distress Ink pad, I stamped the word "Blessings" on a piece of plain white cardstock and mounted it and the maple leaf on another piece of the Tangelo paper.  


Finally, for a little sparkle, I place small dots of Copper Stickles among the branches of the tree, as well as on the Blessings tag.


And there you have it - a sweet little autumnal card that I hope will bring a smile to my friend.  :)

Blessings!


Friday, May 25, 2012

Hidden treasures

Hi all:

I love looking through all of the January CHA releases.  Since winter CHA happens right after Christmas, all of the pretty new things to look at and dream about using are a  great way to escape the winter uglies that happen in February and March. 

This year, there were two new products that really drew my eye.  One was Tim Holtz's Distress Markers because - hello - I'm a Tim Girl.  The other was Heidi Swapp's Memory Files.  What a great way to collect all of the bits and pieces of an event into one compact, easy to store album.  Heidi's Sugar Chic collection is full of bright splashes of aqua, pink, and yellow, set off by stabs of black here and there.  Pure awesomeness!  The cutest embellishments ever are also available.

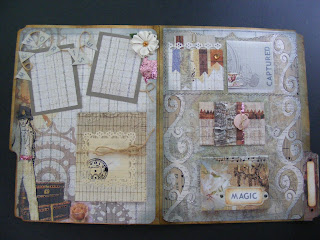
I couldn't resist combining Heidi's ideas with Tim's flair for the vintage and steampunk.  Here is what I came up with:


The adorable little truck is one of Tim's stamps from The Journey by Stampers Anonymous.  The label on the file folder tab was cut with Spellbinders' Grommet Tags die. 


Here is the entire cover.  The gold scrolls were created with Martha Stewart's Craft Clay and the Frames and Flourishes silicone mold.  The flourishes were then painted using Martha Stewart's gold metallic paint.  The paper is Antiquities by Donna Salazar for gcd studios.  This was a plain old manila folder when I started.  It's colored with some of Tim Holtz's Distress Inks - Weathered Wood, Vintage Photo, and Gathered Twigs.

Here are some inside shots:


Same Spellbinders' die, same paper, same distress inks.  The pink tinsel glitter is Martha Stewart's. The silver glitter is Stickles by Ranger.  The ruffled newsprint is Tim Holtz tissue tape, simply gathered into ruffles as it was adhered.  The copper and white twine by Bead Landing, the letters, and the Recollections flowers are all from Michaels.   The letters were white.  I colored them with a gray Copic marker.  :)  The button is an old one - from Bo Bunny, I think.

Here is a complete look at the inside:


This nifty little album lies almost flat when closed, taking up very little space, yet it will hold up to 24 pictures and journaling notes!  Isn't that amazing?!  I love that concept!  That little booklet that say, "Magic" on the bottom right flips open to display 12 pages.  The "Captured" note flips up to display one or two pictures or notes and you can also put something on the front of that if you like.  The button closure hides places for two pictures and a note or three pictures.  It has a magnetic closure.  And the gadget tied with jute on the left side will also hold 3-4 pictures.  And that doesn't even count the front where you can add a title or a picture or both.

I just love this little file.  Hope you enjoyed looking at it!

Kath


Wednesday, February 15, 2012

Altered Art Canvases

Hi all:

Last night, I finished up one of the altered art canvases.  I really, really like how it turned out.


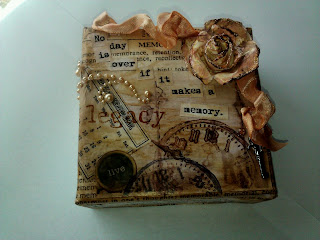
The canvas was purchased at Michaels.  It measures 4" x 4" and right now you can get a package of 9 of them for $19.99.  I used my 40% off coupon and got mine for $12.00!  I used Tim Holtz's Terminology Tissue Wrap Paper.  I cut out the "memory" part and modpodged it onto the canvas.  While it was drying, I printed off a picture in sepia tones, a tiny December calendar, and the words "No day is over if it makes a memory".  I cut apart the words and modpodged everything to the canvas.

To make the ribbon, I colored 1/2" wide white satin ribbon with a Copic marker (YR00 - Powder Pink).  Then, I wet a small paint brush , dried it a bit, and swiped it across the Gathered Twigs Distress Ink Pad.  I used that to "paint" the ribbon in spots - kind of aging it as I went.  I added more color here, more water there until I achieved the effect I wanted.  I scrunched up the ribbon, held it closed with a binder clip and heated it with my embossing tool.  (CAREFUL:  You have to use the embossing tool sparingly and keep it moving or you'll burn the ribbon!  Also, the binder clip gets HOT!)  Let it cool, take the binder clip off and check to see if the ribbon is dry and it's crinkled enough for your taste.  If not, scrunch the ribbon again and re-heat.

To make the flower, I used ivory paper with a cross hatch texture to it.  I tore out a circle about 3 1/2" in diameter.  Then, I tore the circle into a spiral and finally, rolled the spiral into a flower.  I tinted the flower the same way I tinted the ribbon, using the Gathered Twigs Distress Ink pad, a paintbrush, and some water.  When it was dry, I touched it up here and there with another Copic marker (RV11 - Pink).  I pretty much kept the pink color wherever I had painted with the Gathered Twigs.  I then dragged the Gathered Twigs Distress Ink Pad over the edges of the "petals" to darken them a little more.  Finally, I tipped the edges with Stickles in Frosted Lace.

I hot glued the flower and the ribbon, deliberately placing the ribbon where I liked it.  The embellishment of pearls is from the Recollections collection at Michaels.  I've had the key - can't remember where I got it.  It's hot glued into place, as well.  I also can't remember where I got the clock stamps.  I stamped the clocks in Gathered Twigs and Archival Black Ink from Ranger.  The "live" sticker is from the Typewriter Assorted Dots sheet from Studio 112.  The "legacy" stamp is from Michaels $1 collection.  I stamped it with Copic Marker E57 in Light Walnut.  This method will give you a rather rough outline of the stamp itself, which I kind of like.  It sort of looks distressed already, but sometimes it's hard to read, so I went back over it by hand with the same marker and brought the letters out a little bit more.


The quality of the pictures is a little lacking as my SD card for my camera broke and until I can get another one, I'm using my phone's camera.  I wanted to get this posted for you guys, though, so I hope you'll bear with the picture quality.  Enjoy!

Kathy