Showing posts with label Ranger. Show all posts

Tuesday, November 6, 2012

Learning something new

Hi there!

I saw a card recently that I loved.  It had a piece of subway art on it.  Since I love the look of subway art, I decided to track down the stamp, scrapbook paper, or whatever the card's creator had used to make the subway art.  I had no luck.

While talking to a friend, she mentioned that she planned to make her own with her Photoshop program.  I didn't want to purchase Photoshop because I wasn't sure if I'd like it our how much I would use it.  In the end, I downloaded GIMP.  It works almost the same as Photoshop, but it's free.

There is a learning curve involved with this kind of a photo editing program.  My family can attest to the fact that I spent hours trying to figure out how to do this.  Finally, it was finished.  Looking back, there are some things I wish I'd done differently, but it turned out pretty well, I think.  My brain is full of ideas about how to take this newly acquired skill and run with it.

Anyway,  here is the completed card.


Came out pretty well, I thought.  Black and white isn't a typical color combination for Christmas, but in this case, it works.  I think the touches of red Stickles really added something to it - makes it a bit more Christmas-y.  :)


I've already created another piece of subway art, using the words from a famous Christmas carol.  I hope to post it soon.

Talk to you later!

Kathy


Friday, May 25, 2012

Hidden treasures

Hi all:

I love looking through all of the January CHA releases.  Since winter CHA happens right after Christmas, all of the pretty new things to look at and dream about using are a  great way to escape the winter uglies that happen in February and March. 

This year, there were two new products that really drew my eye.  One was Tim Holtz's Distress Markers because - hello - I'm a Tim Girl.  The other was Heidi Swapp's Memory Files.  What a great way to collect all of the bits and pieces of an event into one compact, easy to store album.  Heidi's Sugar Chic collection is full of bright splashes of aqua, pink, and yellow, set off by stabs of black here and there.  Pure awesomeness!  The cutest embellishments ever are also available.

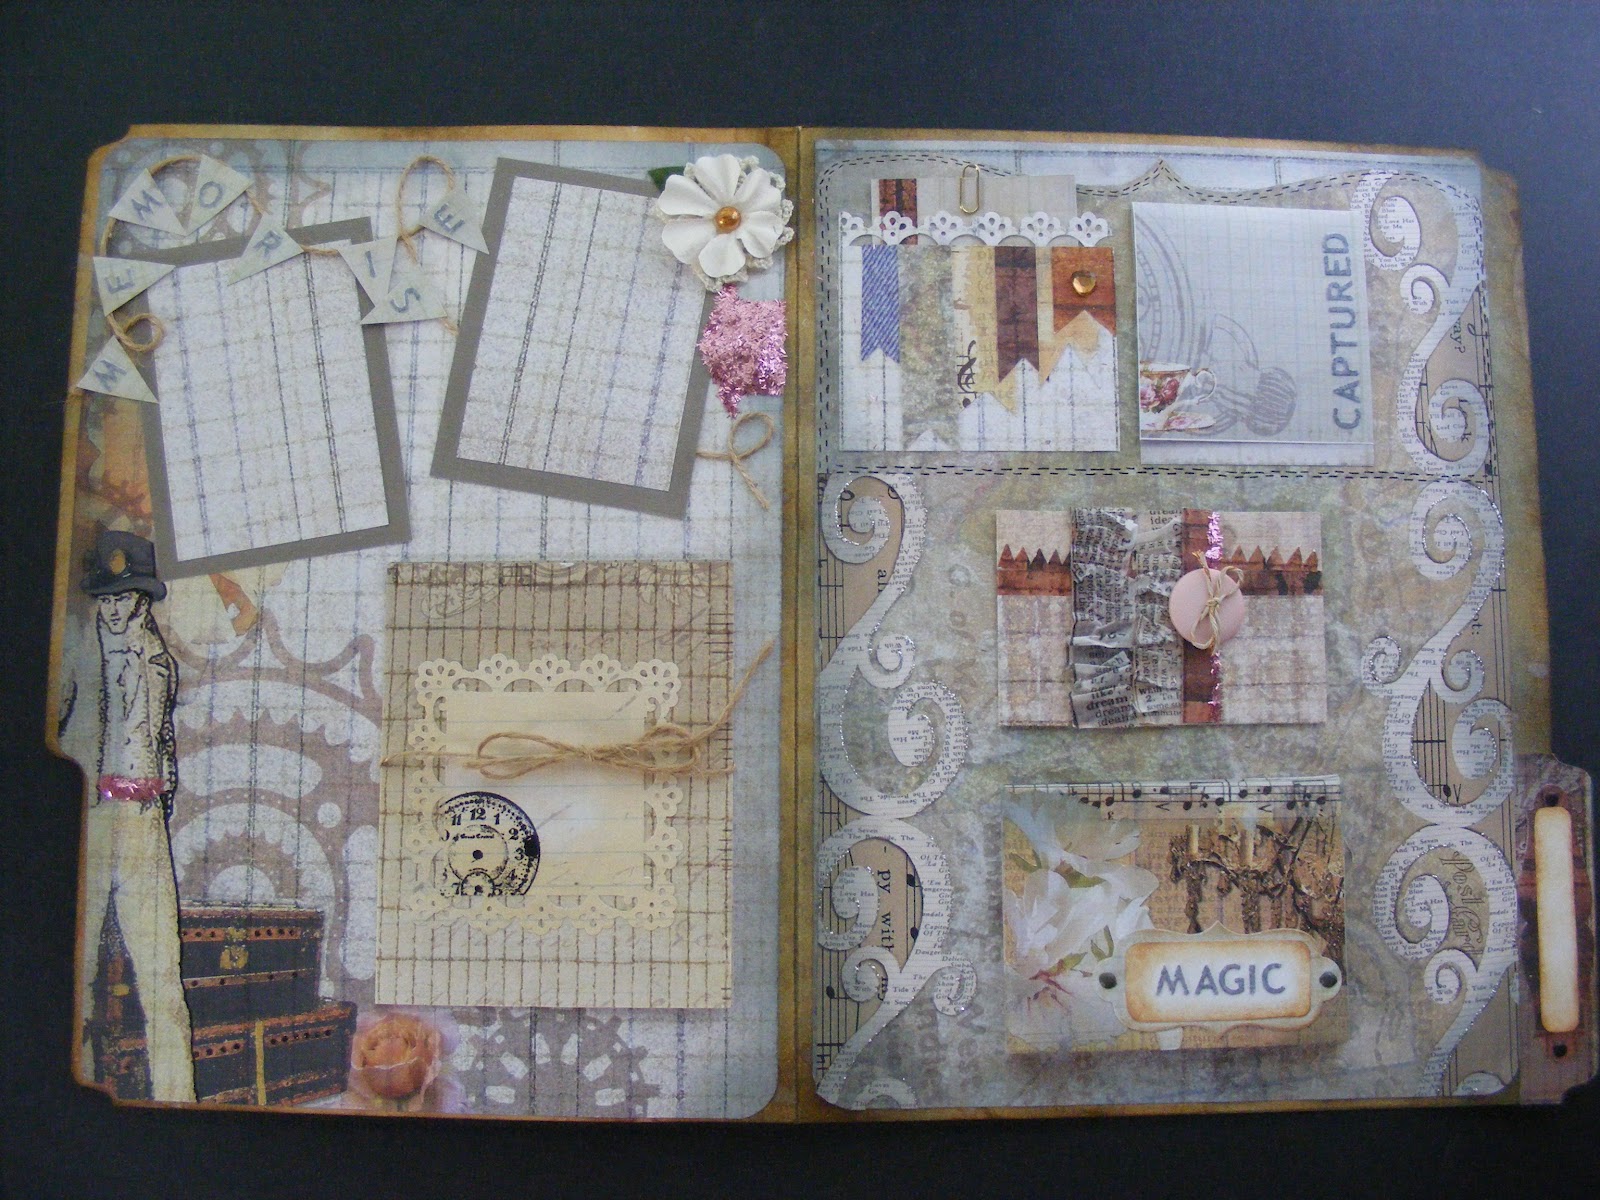
I couldn't resist combining Heidi's ideas with Tim's flair for the vintage and steampunk.  Here is what I came up with:


The adorable little truck is one of Tim's stamps from The Journey by Stampers Anonymous.  The label on the file folder tab was cut with Spellbinders' Grommet Tags die. 


Here is the entire cover.  The gold scrolls were created with Martha Stewart's Craft Clay and the Frames and Flourishes silicone mold.  The flourishes were then painted using Martha Stewart's gold metallic paint.  The paper is Antiquities by Donna Salazar for gcd studios.  This was a plain old manila folder when I started.  It's colored with some of Tim Holtz's Distress Inks - Weathered Wood, Vintage Photo, and Gathered Twigs.

Here are some inside shots:


Same Spellbinders' die, same paper, same distress inks.  The pink tinsel glitter is Martha Stewart's. The silver glitter is Stickles by Ranger.  The ruffled newsprint is Tim Holtz tissue tape, simply gathered into ruffles as it was adhered.  The copper and white twine by Bead Landing, the letters, and the Recollections flowers are all from Michaels.   The letters were white.  I colored them with a gray Copic marker.  :)  The button is an old one - from Bo Bunny, I think.

Here is a complete look at the inside:


This nifty little album lies almost flat when closed, taking up very little space, yet it will hold up to 24 pictures and journaling notes!  Isn't that amazing?!  I love that concept!  That little booklet that say, "Magic" on the bottom right flips open to display 12 pages.  The "Captured" note flips up to display one or two pictures or notes and you can also put something on the front of that if you like.  The button closure hides places for two pictures and a note or three pictures.  It has a magnetic closure.  And the gadget tied with jute on the left side will also hold 3-4 pictures.  And that doesn't even count the front where you can add a title or a picture or both.

I just love this little file.  Hope you enjoyed looking at it!

Kath


Monday, March 5, 2012

Inspiration from Tim Holtz for March

Hi all!

Due  to Open House preparation, I feel a little behind on my blog reading.  Yesterday, I was able to catch up a little bit and...there was Tim's March 2012 Tag!  Yay!!!  I told myself it was too late to get started on it, I have tomorrow off, I can do it then.  That lasted all of about an hour before I gave in.  At 1:00 AM, I decided I was getting dangerously loopy and didn't want to ruin what I'd started.

Again, I did a card rather than a tag.  Tim's tag was a promotion of spring - butterflies and flowers - whereas mine is more about St. Patrick's Day.  You could say I have a little bit of Irish in my background (my maiden name was Ireland), so I love this holiday.  I love the green, the gold, and the rainbow.  I love the wry, humorous Irish blessings.  I love QVC's Irish show - all of the wool sweaters and capes, the Galway crystal, the Belleek china...but I digress...  :)

So, forgive me, Tim for doing something so blatantly "March", but....I couldn't help meself....  :)


The finished product.  There are many parts of this I'm very happy with.  I loved learning the new technique Tim taught us.  The "tiled" or "stained glass" butterflies were the focus of this month's project.  


The butterflies are cut out of grungeboard then covered with double sided super sticky tape.  The tiny pieces of paper are cut and adhered to the butterflies.  Once the mosaic look of the paper snippets were done to my satisfaction, I sprinkled Ranger's Distress Embossing Powder in Black Soot over the butterflies, shook off the excess, and then heated the embossing powder, melting it and making it shiny.  I applied Glossy Accents to the paper pieces, giving them a glassy look, then attached some Swarovski crystals by Jolee to the wings for added sparkle.  This picture doesn't show the colors well.  The paper snippets are in varying shades of greens and creams.  The crystals are peridot or pale yellow in color.  (For more detailed instructions regarding the butterflies, please visit Tim's blog at timholtz.typepad.com )  While the butterflies were drying, I worked on the background.


I started with a sheet of pale gray textured cardstock and ran it through my Vagabond, using the Tim Holtz Sizzix Woodgrain Texture Fade.  To bring out the wood grain, I highlighted the raised parts with the C5 Cool Grey Copic Marker.  I roughened up the edges by scraping my Cutter Bee Scissors along them and then I used Tim Holtz Distress Ink Pad in Weathered Wood to darken the edges.  The scroll is made from regular old run-of-the-mill copy paper.  I went to DaFont.com and downloaded a font called Stonehenge.  (By the way, I know folks are used to seeing Erin Go Bragh, but as I was researching this, I found that the words I used are actually closer to the authentic Celtic version.)  The font size is set at 44 for this one.  After printing off the words, I tore the paper, around the words, leaving extra lengths on both sides of the words.  This allowed room for me to roll the scroll.  I pretty much antiqued the whole paper with Tim Holtz Antique Linen Distress Ink Pad and then went over just the edges with the Vintage Photo Distress Ink Pad.  I rolled the ends of the scroll in opposite directions, holding them there for a few seconds and then, adhered the scroll to the cardstock background.


To make the charm, I used a piece of paper from Tim Holtz Seasonal Paper Stack.  I traced the facet I wanted to use onto the paper, so I could get the sizes correct.  The gold flourish is simply painted on with gold acrylic paint.  


I painted the shamrock with watercolors on watercolor paper and cut it out.  I adhered it next to the gold scroll work on the paper then cut the shape out.  Using Glossy Accents, I adhered the facet to the paper backing, set a heavy object on top of the facet and left it to dry.  When the Glossy Accents was dry, I trimmed the excess paper around the facet.  This is an acrylic facet, also by Tim Holtz.  I used Copic markers G09 - Veronese Green and YG93 - Grayish Yellow to color the ribbon that's threaded through the ring on the facet.  I hotglued the ribbon to the card and voila! - done!

Lots of fun and lot of green St. Patrick's Day goodness!

See you soon ~

Kath


Wednesday, February 15, 2012

Altered Art Canvases

Hi all:

Last night, I finished up one of the altered art canvases.  I really, really like how it turned out.


The canvas was purchased at Michaels.  It measures 4" x 4" and right now you can get a package of 9 of them for $19.99.  I used my 40% off coupon and got mine for $12.00!  I used Tim Holtz's Terminology Tissue Wrap Paper.  I cut out the "memory" part and modpodged it onto the canvas.  While it was drying, I printed off a picture in sepia tones, a tiny December calendar, and the words "No day is over if it makes a memory".  I cut apart the words and modpodged everything to the canvas.

To make the ribbon, I colored 1/2" wide white satin ribbon with a Copic marker (YR00 - Powder Pink).  Then, I wet a small paint brush , dried it a bit, and swiped it across the Gathered Twigs Distress Ink Pad.  I used that to "paint" the ribbon in spots - kind of aging it as I went.  I added more color here, more water there until I achieved the effect I wanted.  I scrunched up the ribbon, held it closed with a binder clip and heated it with my embossing tool.  (CAREFUL:  You have to use the embossing tool sparingly and keep it moving or you'll burn the ribbon!  Also, the binder clip gets HOT!)  Let it cool, take the binder clip off and check to see if the ribbon is dry and it's crinkled enough for your taste.  If not, scrunch the ribbon again and re-heat.

To make the flower, I used ivory paper with a cross hatch texture to it.  I tore out a circle about 3 1/2" in diameter.  Then, I tore the circle into a spiral and finally, rolled the spiral into a flower.  I tinted the flower the same way I tinted the ribbon, using the Gathered Twigs Distress Ink pad, a paintbrush, and some water.  When it was dry, I touched it up here and there with another Copic marker (RV11 - Pink).  I pretty much kept the pink color wherever I had painted with the Gathered Twigs.  I then dragged the Gathered Twigs Distress Ink Pad over the edges of the "petals" to darken them a little more.  Finally, I tipped the edges with Stickles in Frosted Lace.

I hot glued the flower and the ribbon, deliberately placing the ribbon where I liked it.  The embellishment of pearls is from the Recollections collection at Michaels.  I've had the key - can't remember where I got it.  It's hot glued into place, as well.  I also can't remember where I got the clock stamps.  I stamped the clocks in Gathered Twigs and Archival Black Ink from Ranger.  The "live" sticker is from the Typewriter Assorted Dots sheet from Studio 112.  The "legacy" stamp is from Michaels $1 collection.  I stamped it with Copic Marker E57 in Light Walnut.  This method will give you a rather rough outline of the stamp itself, which I kind of like.  It sort of looks distressed already, but sometimes it's hard to read, so I went back over it by hand with the same marker and brought the letters out a little bit more.


The quality of the pictures is a little lacking as my SD card for my camera broke and until I can get another one, I'm using my phone's camera.  I wanted to get this posted for you guys, though, so I hope you'll bear with the picture quality.  Enjoy!

Kathy

Sunday, February 12, 2012

Hi all:

I am sooooo ready to create something new, but circumstances of life have occupied my time of late.  Keeping my fingers crossed that sometime in the next few days, I can make a mixed media canvas or two or some shabby chic picture frames - those are next up.  Then I want to try those amazing memory files and the magnetic closures - so much in my brain!!  :)

I finished my paper bag mini album last week, but neglected to post the pictures here.  (I think I did put them on my Kat's Scraps fb page.  Click here to see my fb page.

Anyway, here is the finished product.  I'm quite proud of it.  Do you see the influences of Tim Holtz?  (That's a rhetorical question...)  :)


The little ticket can be filled in with someone's name, a date, or an event - whatever the theme of the album is.

Untied.....

Pages 1 and 2.  The black mat on the left page is for a picture or memento.  The object can be slid under the band with the gear on it.

Pages 1 and 2, displaying the pocket in between and the tags contained in the pocket.  Tags are useful for additional photos, memorabilia, or journaling.

These tags are contained in a pocket built into page 2.  You can see them as they are actually stowed in the pocket if you go back and look at the picture above.

Pages 3 and 4 and the pocket between.  Note the pearls on page 3 in the lower left corner.  Those were white, but I colored them with a Copic marker.  Also, notice the chain and charm attached to the pocket in this one.  I made the charm by applying a sticker to a small piece of black paper, laying the open heart shape charm over the sticker, and filling the charm with Glossy Accents.  Voila!

More tags, pockets, and envelopes.

Pages 5 and 6.  As you'll see below, the flap on page 5 folds down for journaling or additional pics, while the flap on page 6 folds out....

Flap folded down - page 5

Page 6 and pocket between pages 5 and 6

Flap opened on page 6

More tags....

Back cover


  • Paper - "Tattered Time" - DCWV
  • Kraft glassine envelope, metal gears, bead chain, journaling ticket, trinket pin, Gathered Twigs Distress Ink - Tim Holtz
  • Glossy Accents - Ranger
  • Canvas - purchased at Michaels in a single sheet.