Showing posts with label scrapbook. Show all posts

Wednesday, July 25, 2012

Christmas in July

In this age of technology, it's a huge frustration when a computer goes down.  Mine went silent on June 12.  Since then, I've limped along with my iPad, but frankly, it just doesn't do everything I'd like it to do.  So, my blog writing has suffered.

The lack of a computer has not hampered me from creating new things, however.  I've been super busy cranking out item after item.  Over the last ten days, I've been feverishly working to get sample items together.  I wanted to use them to apply for Heidi Swapp's media team.  I completed all of the samples, only to find myself stymied by the lack of proper computer technology.  Kind of tough to actively promote your technology skills with...well...technology.  Three hours before the deadline, I gave up.  There will always be next year.

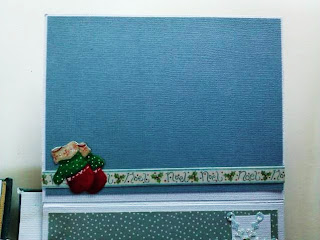
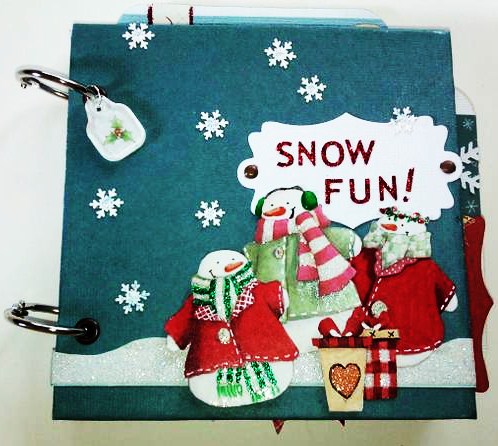
I also recently put together a mini album.  My sister's branch office assembled a "Christmas in July" basket for a company picnic that was held last week.  She asked me to create an album for the basket.  I pulled out my Christmas papers and went to town.  It was kind of fun to bring out the Christmas stuff again.

The album measures 5" x 5" and there is room for a minimum of 18 pictures.  There are four pockets in the album, a tiny "openable" as Heidi Swapp calls them, and lots of pretty things.  My sister was thrilled.  I hope the recipient of the Christmas in July basket was also thrilled!  :)


This page features one of the pockets and some little embellishments on sticks.  It's finished off with some silver and white twine.  Super cute!


Pennants are a hot theme right now - love these made from lots of pretty papers in the stack.  The embellishments at the bottom include a snowman - his scarf flapping in the winter wind -, a little penguin floating his star shaped balloon, and a sparkly snowflake highlighted with a blue Swarovski crytal.  


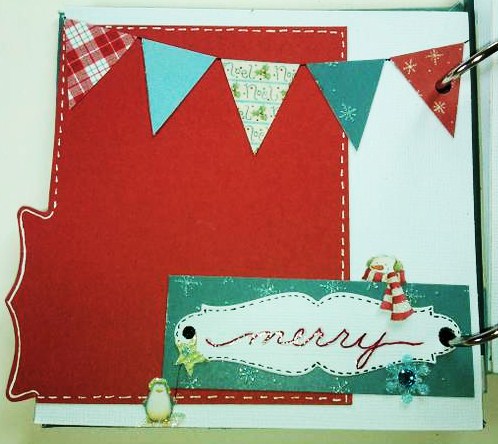
Another pennant banner, this one being held up by two cute little snowmen.  This banner floats free of the page so that a picture or journaling can be added under it.  


Another pocket page - this one on the side between the two pages.  I love the cream and blue winter-y colors on this page.  More glittery snowflakes are highlighted....


This pocket holds a journaling tag, or two, if you prefer.  More pretty blue and cream colors.

I love plaids.  This one is so cheery!  More sparkly snowflakes and Swarovski crystals.  
My favorite page of the book!  This is the cover of a mini open-able flip album, as Heidi Swapp calls them.  There is room to mount pictures and journaling on this page, if desired.  But the coolest feature is....wait for it....

The pages flip up to reveal MORE places to put memorabilia, pictures, journaling, notes, or whatever you desire.  On this one small 5" x 5" page, the flip book allows room to store at least five pictures.  Amazing!  More pages of the flip book follow....


This last page is a pocket, too, which allows it to hold more than one picture or memorabilia.  It could also be used to just frame some pictures and skip the pocket altogether.  I love versatility!!  :)


ANOTHER pocket.  More great ways to store things in a small space.  The tag sports red glitter dots along the top edge.   I also love that super glitzy, glittery arrow.  So pretty!


Aren't these guys adorable?!  Love, love, love them!  This is a pocket page, too.  You can see the tag sticking up out of the top of the pocket.  


Here's the tag.  I love the word "this".  Remember this.  Feel this.  Think about this.  Experience this.  Celebrate this.


The back of the "This" tag.  Sweet little bow and some gingham.  You can't go wrong there.  :)

And finally.....


Santa Claus!!!  

I hope you enjoyed this little album.  I had a great time making it.


Tuesday, April 24, 2012

A Banner Day...

Hello everyone!

May is National Scrapbook Month, and, more specifically, May 5th is National Scrapbook Day.  There is much going on at the store in preparation for this awesome event.

Today, I stayed after work for a few hours.  I'm working on making some attention grabbing items to put around the store to promote NSM.  Last Saturday at crop, I began making a banner.  I found a Recollections paper pad that I really like.  It's a light weight paper - not anywhere near card stock weight - but for what I'm doing, it works well.  I like the colors and I'm hoping we can hang it over the scrapbook aisle.

I've talked about Martha Stewart's Scoring Board before.  I love using this tool.  Martha's products are well made and they often include built in storage for all of the little pieces you need to use with the tool.  This one is no exception.  The scoring tool itself stores inside a little compartment at the top of the scoring board and the triangular piece that's used to make envelopes slides into a convenient slot on the back of the tool.  Excellent!

Primarily, I use this scoring tool to make rosettes of varying sizes and colors.  To make these rosettes, I started with a 12" x 12" paper.  I cut three strips measuring 12" x 3 1/2".  I scored each strip at every 1/2" mark and folded the strips in an accordion style.


In the foreground, two folded strips.  In the background, the last of the three strips, waiting to be folded.

When making rosettes, glue the folded strips end to end.  When all of the strips are glued into one strip, glue the ends of the one strip together to form a perfectly pleated circle.  Set it aside.

Cut out two circles for the center of your rosette.  In this case, the circle I used was 4 inches across.  I wanted a larger circle because I planned to put a letter in the center of each rosette.  The size of the circle is a matter of preference.  It just needs to be big enough to cover the center of the rosette.

The next part is a bit tricky.  Set the pleated circle on end.  Gather the top part of the circle together in one hand and gently pull out the bottom part of the circle with the other hand.  With practice, you'll get a feel for it.  The circle should  kind of splat out.  Glue one cut out circle to the center on the front and one to the center on the back.  Keeping the rosette in formation while gluing on the center circles comes with practice, as well.  I like to use hot glue because it sets and holds almost immediately.

The banner that I'm working on is in shades of green, blue and pink.  Below are some pictures of the completed rosettes on their pennants.


I did get the letters cut out and glued on to each rosette today.  I also glued on the loops for hanging the banner.  But, alas, I forgot to take pictures when they were done.  I will post them as soon as I can.  I will also post pictures of the banner when it's hung.  Stay tuned....

Kath


Friday, March 23, 2012

Emily's Book

Hi all:

So, after I got all three of my cards done for the Stamping Royalty challenge, I started to focus on other projects that were lined up.

Last year, I experimented with making some small graduation albums for my nieces and nephew.  They measured about 5" x 5", making them small enough to be pretty portable if they wanted to take them to school. I'm not sure if they ever used them (they are teenagers, after all), but the adults seemed to appreciate all of the effort that I put into the albums.  :)

This year, my mom asked if I'd do one for my cousin's daughter, Emily.  I promised her I'd get started with it as soon as the cards were done for the challenge.  Tonight, I finished it.  It was kind of fun to do this album for Emily, as she is graduating from my alma mater.


 That's our little mascot - the Lakota Raider.  :)  I got him off the Raiders' facebook page.  I printed him, cut him out, and then highlighted him with glossy accents.  The words were printed off and cut to fit the matted piece.


The corners of the striped paper were punched with a Martha Stewart punch, then blue cardstock was placed behind the punched corners to bring out the detail.


I like how this page turned out.  The matted areas can be used for pictures, memorabilia, or journaling.  These are different colors of cardstock, one matted on top of the other.  A couple of them were highlighted with patterns using a white gel pen.


I drew the volleyball and then filled it in with glossy accents.  The words were printed out in blue ink and then matted on matching cardstock.


The paper lace was cut out with a Fiskar's punch called "lace".  The tag was cut with a spellbinders die.  The pearls were colored with a copic marker and the words are handwritten.  The page on the left is actually a pocket page.  I like to include pockets to catch things the folks might not want to glue into a book.


Just cardstock and blue glitter letters.  I included all of the textspeak to make it more teen friendly.  :)


Emily was in the school play this spring.  The rose under glass is hand-drawn.


 The paper with the lace edges is punched with a Martha Stewart "Punch Around the Page" set.  The word is printed off and then adhered to the page.

I hope Emily enjoys filling this with all kinds of memories from her senior year.

Take care ~
Kathy


Friday, February 17, 2012

Making "mistakes"

Hey there:

Over the last couple of days, I haven't had time to be at my desk playing with pens, paints, and powders.  I hope to remedy that situation tomorrow.  In the meantime, I was reading through the blogs I like to follow and came across this one today.

What I love about this is that Ali Edwards - one of the most well-known and beloved names in the scrapbooking field - walks us through one of her creations in an honest, transparent way.  In this post, we see that scrapbooking is truly a process.  You start with a vision that may or may not turn out the way you see it in your head, you use tools you're not familiar with and find out they do exactly what you wanted them to do - or not - and you make mistakes.  When I make a mistake in my scrapbooking, I tend to go with it.  What can I add to it?  How can I change my original vision to embrace what I just goofed up?  Is there a creative way to cover it that will look as if I planned it that way all along?  See?  It's very difficult to truly make a mistake.

Anyway, on with Ali's process.  I really like the way she wrote the embossed words on this and then journaled in between.  Definitely a technique I want to try.  Enjoy!

http://aliedwards.com/2012/02/siblings-traditional-scrapbook-layout.html?utm_source=feedburner&utm_medium=feed&utm_campaign=Feed%3A+aliedwards+%28%7B+A+%7D%29


Kathy

Wednesday, February 15, 2012

Altered Art Canvases

Hi all:

Last night, I finished up one of the altered art canvases.  I really, really like how it turned out.


The canvas was purchased at Michaels.  It measures 4" x 4" and right now you can get a package of 9 of them for $19.99.  I used my 40% off coupon and got mine for $12.00!  I used Tim Holtz's Terminology Tissue Wrap Paper.  I cut out the "memory" part and modpodged it onto the canvas.  While it was drying, I printed off a picture in sepia tones, a tiny December calendar, and the words "No day is over if it makes a memory".  I cut apart the words and modpodged everything to the canvas.

To make the ribbon, I colored 1/2" wide white satin ribbon with a Copic marker (YR00 - Powder Pink).  Then, I wet a small paint brush , dried it a bit, and swiped it across the Gathered Twigs Distress Ink Pad.  I used that to "paint" the ribbon in spots - kind of aging it as I went.  I added more color here, more water there until I achieved the effect I wanted.  I scrunched up the ribbon, held it closed with a binder clip and heated it with my embossing tool.  (CAREFUL:  You have to use the embossing tool sparingly and keep it moving or you'll burn the ribbon!  Also, the binder clip gets HOT!)  Let it cool, take the binder clip off and check to see if the ribbon is dry and it's crinkled enough for your taste.  If not, scrunch the ribbon again and re-heat.

To make the flower, I used ivory paper with a cross hatch texture to it.  I tore out a circle about 3 1/2" in diameter.  Then, I tore the circle into a spiral and finally, rolled the spiral into a flower.  I tinted the flower the same way I tinted the ribbon, using the Gathered Twigs Distress Ink pad, a paintbrush, and some water.  When it was dry, I touched it up here and there with another Copic marker (RV11 - Pink).  I pretty much kept the pink color wherever I had painted with the Gathered Twigs.  I then dragged the Gathered Twigs Distress Ink Pad over the edges of the "petals" to darken them a little more.  Finally, I tipped the edges with Stickles in Frosted Lace.

I hot glued the flower and the ribbon, deliberately placing the ribbon where I liked it.  The embellishment of pearls is from the Recollections collection at Michaels.  I've had the key - can't remember where I got it.  It's hot glued into place, as well.  I also can't remember where I got the clock stamps.  I stamped the clocks in Gathered Twigs and Archival Black Ink from Ranger.  The "live" sticker is from the Typewriter Assorted Dots sheet from Studio 112.  The "legacy" stamp is from Michaels $1 collection.  I stamped it with Copic Marker E57 in Light Walnut.  This method will give you a rather rough outline of the stamp itself, which I kind of like.  It sort of looks distressed already, but sometimes it's hard to read, so I went back over it by hand with the same marker and brought the letters out a little bit more.


The quality of the pictures is a little lacking as my SD card for my camera broke and until I can get another one, I'm using my phone's camera.  I wanted to get this posted for you guys, though, so I hope you'll bear with the picture quality.  Enjoy!

Kathy

Sunday, February 12, 2012

Hi all:

I am sooooo ready to create something new, but circumstances of life have occupied my time of late.  Keeping my fingers crossed that sometime in the next few days, I can make a mixed media canvas or two or some shabby chic picture frames - those are next up.  Then I want to try those amazing memory files and the magnetic closures - so much in my brain!!  :)

I finished my paper bag mini album last week, but neglected to post the pictures here.  (I think I did put them on my Kat's Scraps fb page.  Click here to see my fb page.

Anyway, here is the finished product.  I'm quite proud of it.  Do you see the influences of Tim Holtz?  (That's a rhetorical question...)  :)


The little ticket can be filled in with someone's name, a date, or an event - whatever the theme of the album is.

Untied.....

Pages 1 and 2.  The black mat on the left page is for a picture or memento.  The object can be slid under the band with the gear on it.

Pages 1 and 2, displaying the pocket in between and the tags contained in the pocket.  Tags are useful for additional photos, memorabilia, or journaling.

These tags are contained in a pocket built into page 2.  You can see them as they are actually stowed in the pocket if you go back and look at the picture above.

Pages 3 and 4 and the pocket between.  Note the pearls on page 3 in the lower left corner.  Those were white, but I colored them with a Copic marker.  Also, notice the chain and charm attached to the pocket in this one.  I made the charm by applying a sticker to a small piece of black paper, laying the open heart shape charm over the sticker, and filling the charm with Glossy Accents.  Voila!

More tags, pockets, and envelopes.

Pages 5 and 6.  As you'll see below, the flap on page 5 folds down for journaling or additional pics, while the flap on page 6 folds out....

Flap folded down - page 5

Page 6 and pocket between pages 5 and 6

Flap opened on page 6

More tags....

Back cover


  • Paper - "Tattered Time" - DCWV
  • Kraft glassine envelope, metal gears, bead chain, journaling ticket, trinket pin, Gathered Twigs Distress Ink - Tim Holtz
  • Glossy Accents - Ranger
  • Canvas - purchased at Michaels in a single sheet.  

Wednesday, February 8, 2012

Welcome....

Welcome!


Recently, I was reflecting on the twists and turns my life has taken over the years.  I've worked in fast food, school districts, a flower shop, and the early childhood education field.  Finally, at this point, I have the freedom and where with all to explore one of the passions in my life - working with paper.


I started out putting scrapbooks together.  First, I attempted to document one of my husband's mission trips.  He went to Fruitful Vale in Jamaica, so I put a lot of construction paper fruit on those pages.  Ugh.  One of my next projects was to document an entire year in the life of our family.  Six months into the project, I had so many pages in there, the book fell apart. Nowadays, I look back at my original attempts, roll my eyes, and thank goodness for all that I've learned since then.  


I now work with paper both on and off the page - meaning - I still scrapbook sometimes, but I also do mixed media projects, altered art, paper flowers, glitter projects, and many other art forms that catch my attention. 


I have a wonderful support group around me - gals who are my artistic muses, fellow scrapbook instructors.  I also search out terrific sources of inspiration - Tim Holtz and Ali Edwards especially.   


Now, I'm fortunate enough to be able to combine two of my favorite things - working with paper and teaching.  I'm a certified scrapbook instructor, capable of teaching all sorts of tricks and techniques.  I love finding new tools and new ways to use them.  Stay tuned - I'll share all of my findings with you....