
Hi all:
Last night, I finished up one of the altered art canvases. I really, really like how it turned out.

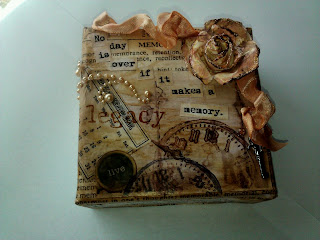
The canvas was purchased at Michaels. It measures 4" x 4" and right now you can get a package of 9 of them for $19.99. I used my 40% off coupon and got mine for $12.00! I used Tim Holtz's Terminology Tissue Wrap Paper. I cut out the "memory" part and modpodged it onto the canvas. While it was drying, I printed off a picture in sepia tones, a tiny December calendar, and the words "No day is over if it makes a memory". I cut apart the words and modpodged everything to the canvas.
To make the ribbon, I colored 1/2" wide white satin ribbon with a Copic marker (YR00 - Powder Pink). Then, I wet a small paint brush , dried it a bit, and swiped it across the Gathered Twigs Distress Ink Pad. I used that to "paint" the ribbon in spots - kind of aging it as I went. I added more color here, more water there until I achieved the effect I wanted. I scrunched up the ribbon, held it closed with a binder clip and heated it with my embossing tool. (CAREFUL: You have to use the embossing tool sparingly and keep it moving or you'll burn the ribbon! Also, the binder clip gets HOT!) Let it cool, take the binder clip off and check to see if the ribbon is dry and it's crinkled enough for your taste. If not, scrunch the ribbon again and re-heat.
To make the flower, I used ivory paper with a cross hatch texture to it. I tore out a circle about 3 1/2" in diameter. Then, I tore the circle into a spiral and finally, rolled the spiral into a flower. I tinted the flower the same way I tinted the ribbon, using the Gathered Twigs Distress Ink pad, a paintbrush, and some water. When it was dry, I touched it up here and there with another Copic marker (RV11 - Pink). I pretty much kept the pink color wherever I had painted with the Gathered Twigs. I then dragged the Gathered Twigs Distress Ink Pad over the edges of the "petals" to darken them a little more. Finally, I tipped the edges with Stickles in Frosted Lace.
I hot glued the flower and the ribbon, deliberately placing the ribbon where I liked it. The embellishment of pearls is from the Recollections collection at Michaels. I've had the key - can't remember where I got it. It's hot glued into place, as well. I also can't remember where I got the clock stamps. I stamped the clocks in Gathered Twigs and Archival Black Ink from Ranger. The "live" sticker is from the Typewriter Assorted Dots sheet from Studio 112. The "legacy" stamp is from Michaels $1 collection. I stamped it with Copic Marker E57 in Light Walnut. This method will give you a rather rough outline of the stamp itself, which I kind of like. It sort of looks distressed already, but sometimes it's hard to read, so I went back over it by hand with the same marker and brought the letters out a little bit more.


The quality of the pictures is a little lacking as my SD card for my camera broke and until I can get another one, I'm using my phone's camera. I wanted to get this posted for you guys, though, so I hope you'll bear with the picture quality. Enjoy!
Kathy
Last night, I finished up one of the altered art canvases. I really, really like how it turned out.

The canvas was purchased at Michaels. It measures 4" x 4" and right now you can get a package of 9 of them for $19.99. I used my 40% off coupon and got mine for $12.00! I used Tim Holtz's Terminology Tissue Wrap Paper. I cut out the "memory" part and modpodged it onto the canvas. While it was drying, I printed off a picture in sepia tones, a tiny December calendar, and the words "No day is over if it makes a memory". I cut apart the words and modpodged everything to the canvas.
To make the ribbon, I colored 1/2" wide white satin ribbon with a Copic marker (YR00 - Powder Pink). Then, I wet a small paint brush , dried it a bit, and swiped it across the Gathered Twigs Distress Ink Pad. I used that to "paint" the ribbon in spots - kind of aging it as I went. I added more color here, more water there until I achieved the effect I wanted. I scrunched up the ribbon, held it closed with a binder clip and heated it with my embossing tool. (CAREFUL: You have to use the embossing tool sparingly and keep it moving or you'll burn the ribbon! Also, the binder clip gets HOT!) Let it cool, take the binder clip off and check to see if the ribbon is dry and it's crinkled enough for your taste. If not, scrunch the ribbon again and re-heat.
To make the flower, I used ivory paper with a cross hatch texture to it. I tore out a circle about 3 1/2" in diameter. Then, I tore the circle into a spiral and finally, rolled the spiral into a flower. I tinted the flower the same way I tinted the ribbon, using the Gathered Twigs Distress Ink pad, a paintbrush, and some water. When it was dry, I touched it up here and there with another Copic marker (RV11 - Pink). I pretty much kept the pink color wherever I had painted with the Gathered Twigs. I then dragged the Gathered Twigs Distress Ink Pad over the edges of the "petals" to darken them a little more. Finally, I tipped the edges with Stickles in Frosted Lace.
I hot glued the flower and the ribbon, deliberately placing the ribbon where I liked it. The embellishment of pearls is from the Recollections collection at Michaels. I've had the key - can't remember where I got it. It's hot glued into place, as well. I also can't remember where I got the clock stamps. I stamped the clocks in Gathered Twigs and Archival Black Ink from Ranger. The "live" sticker is from the Typewriter Assorted Dots sheet from Studio 112. The "legacy" stamp is from Michaels $1 collection. I stamped it with Copic Marker E57 in Light Walnut. This method will give you a rather rough outline of the stamp itself, which I kind of like. It sort of looks distressed already, but sometimes it's hard to read, so I went back over it by hand with the same marker and brought the letters out a little bit more.


The quality of the pictures is a little lacking as my SD card for my camera broke and until I can get another one, I'm using my phone's camera. I wanted to get this posted for you guys, though, so I hope you'll bear with the picture quality. Enjoy!
Kathy


